23 September 2010

Its been awhile...

Well. Its been awhile since I've sat down to write. Anything.

On going projects are now numbering four, instead of two. I shall list:
    1. 1999 M900 - Current Project for this bike is lightweight wheel upgrade, SBK forks with Ohlins internals, TPO Lightweight front Axle. Future changes will include reducing size/number of gauges, installing 6-piston billet monobloc ISR calipers, installing VeeTwo Lightweight Primary Gears, installing High-Torque Cams, fitting larger radiator (NCR or Febur)

    2. SBK "966" Project: Less than 20% complete - 1198 forks, TPO lightweight front axle, BST wheels, working on all carbon fiber bodywork, motor needs boring plating for 95mm pistons, crank lightening/balancing, investigating ceramic hybrid bearings, looking into wiring/gauge systems (leaning towards Motogadget).

    3. "Project Monster" - The "Trackster" (not yet acquired). I have the bodywork from the "Monster Cup Challenge" or whatever it may have been called (Ducati S4 Challenge, I believe) - a Monster-only racing series that ran in England. With CA-Cycleworks' new MTT43 "Monster Track Tank". I also have lots of other Monster accessories, and I think it would be a fun, unique bike to play about on.

    4. Milli's bike - my wife has gotten her motorcycle license, so while I would like to continue working on the above three project motorcycles, acquiring a bike for her to learn on has gotten a top priority spot.

      04 May 2010

      Project 900SBK

      Progress on the SBK 900 build is slow going due to budget, but its exciting to say the least. 748 Frame, Monoposto subframe, Powdercoated swingarm. Missing a few major components like triples, forks, and shock, and then it will be nearly ready to be a rolling-chassis. Here's a shot:

      M900: Current Pictures

      Well, I thought it was high time I threw a few pictures of the bike up after the Keihin FCR 41 carb install.
      The last image is obviously HDR.


      15 April 2010

      Project Motor: Testa Aerea

      Well, if you've visited here ever before, you'd notice that the name has recently changed. And has changed again.

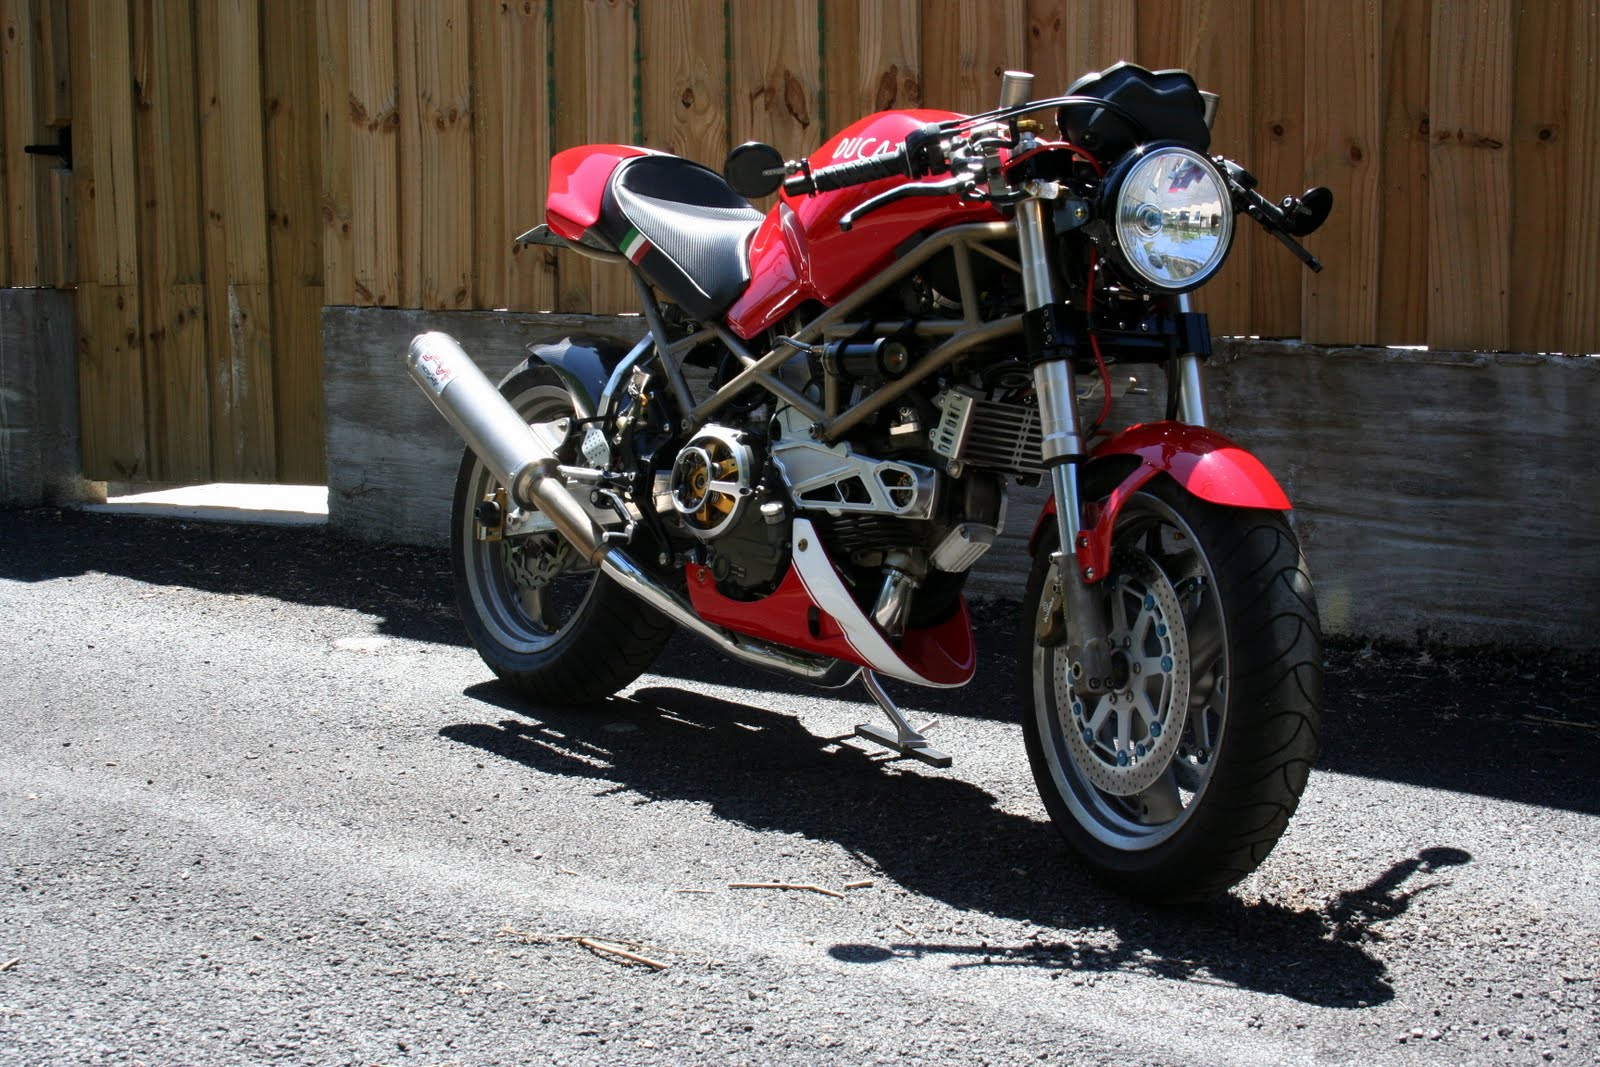
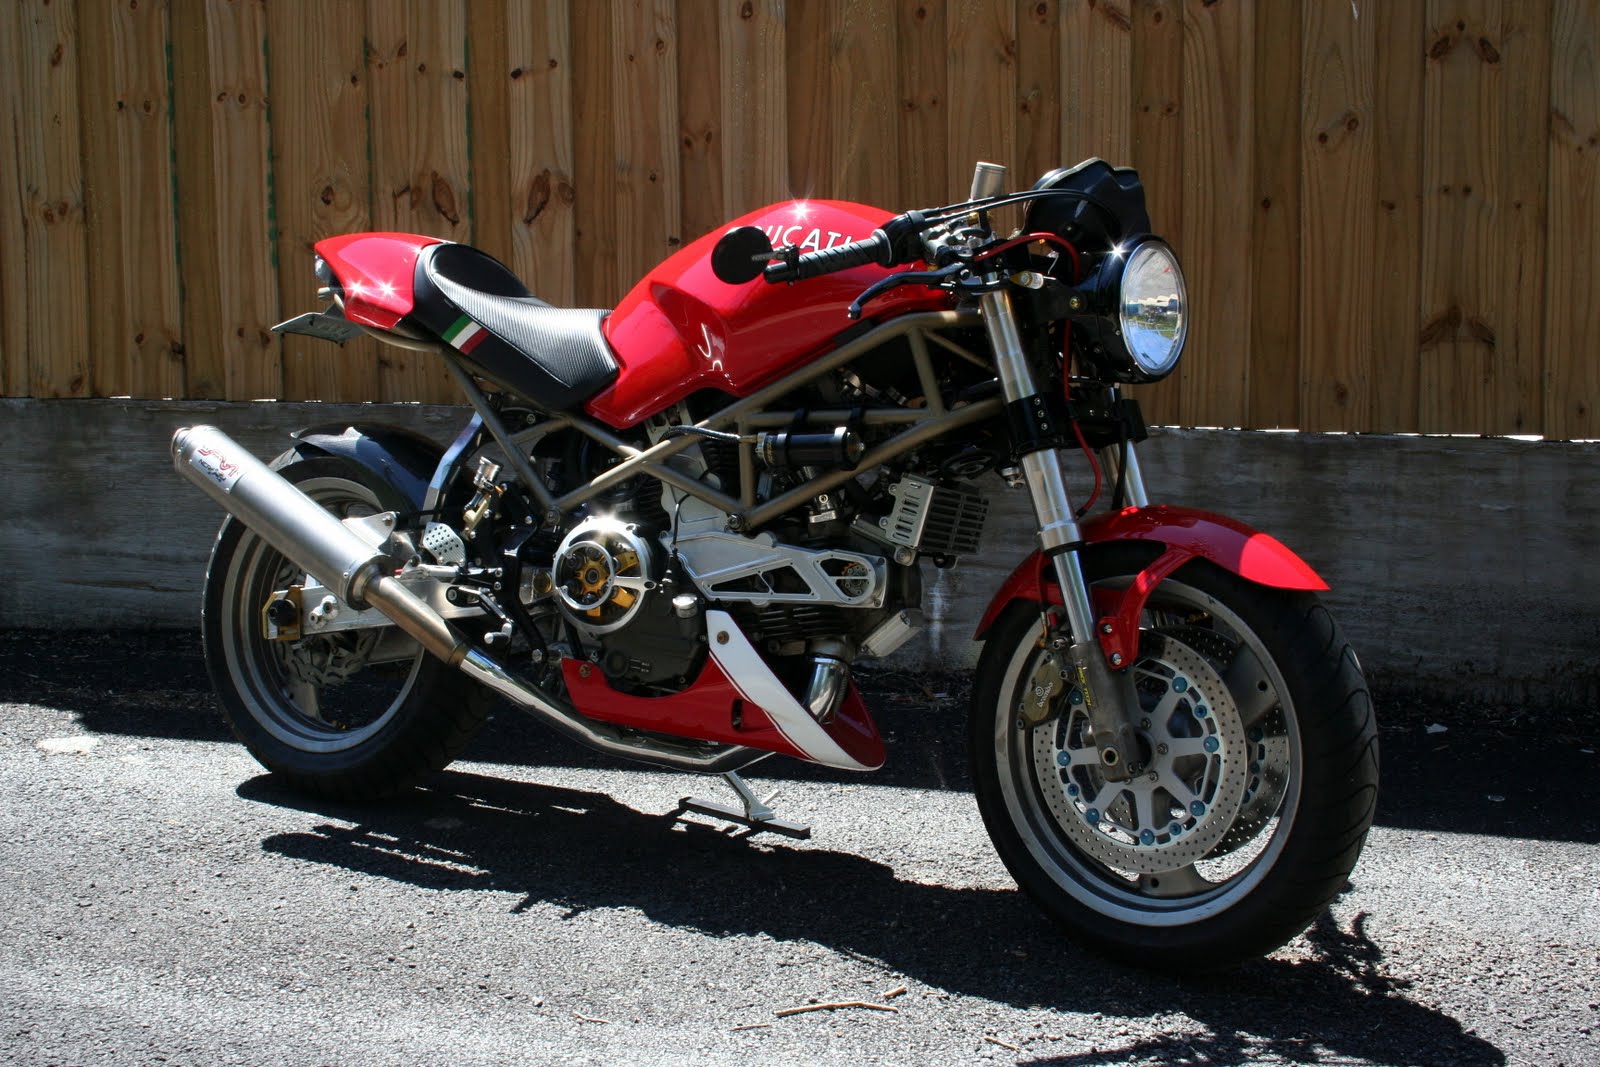
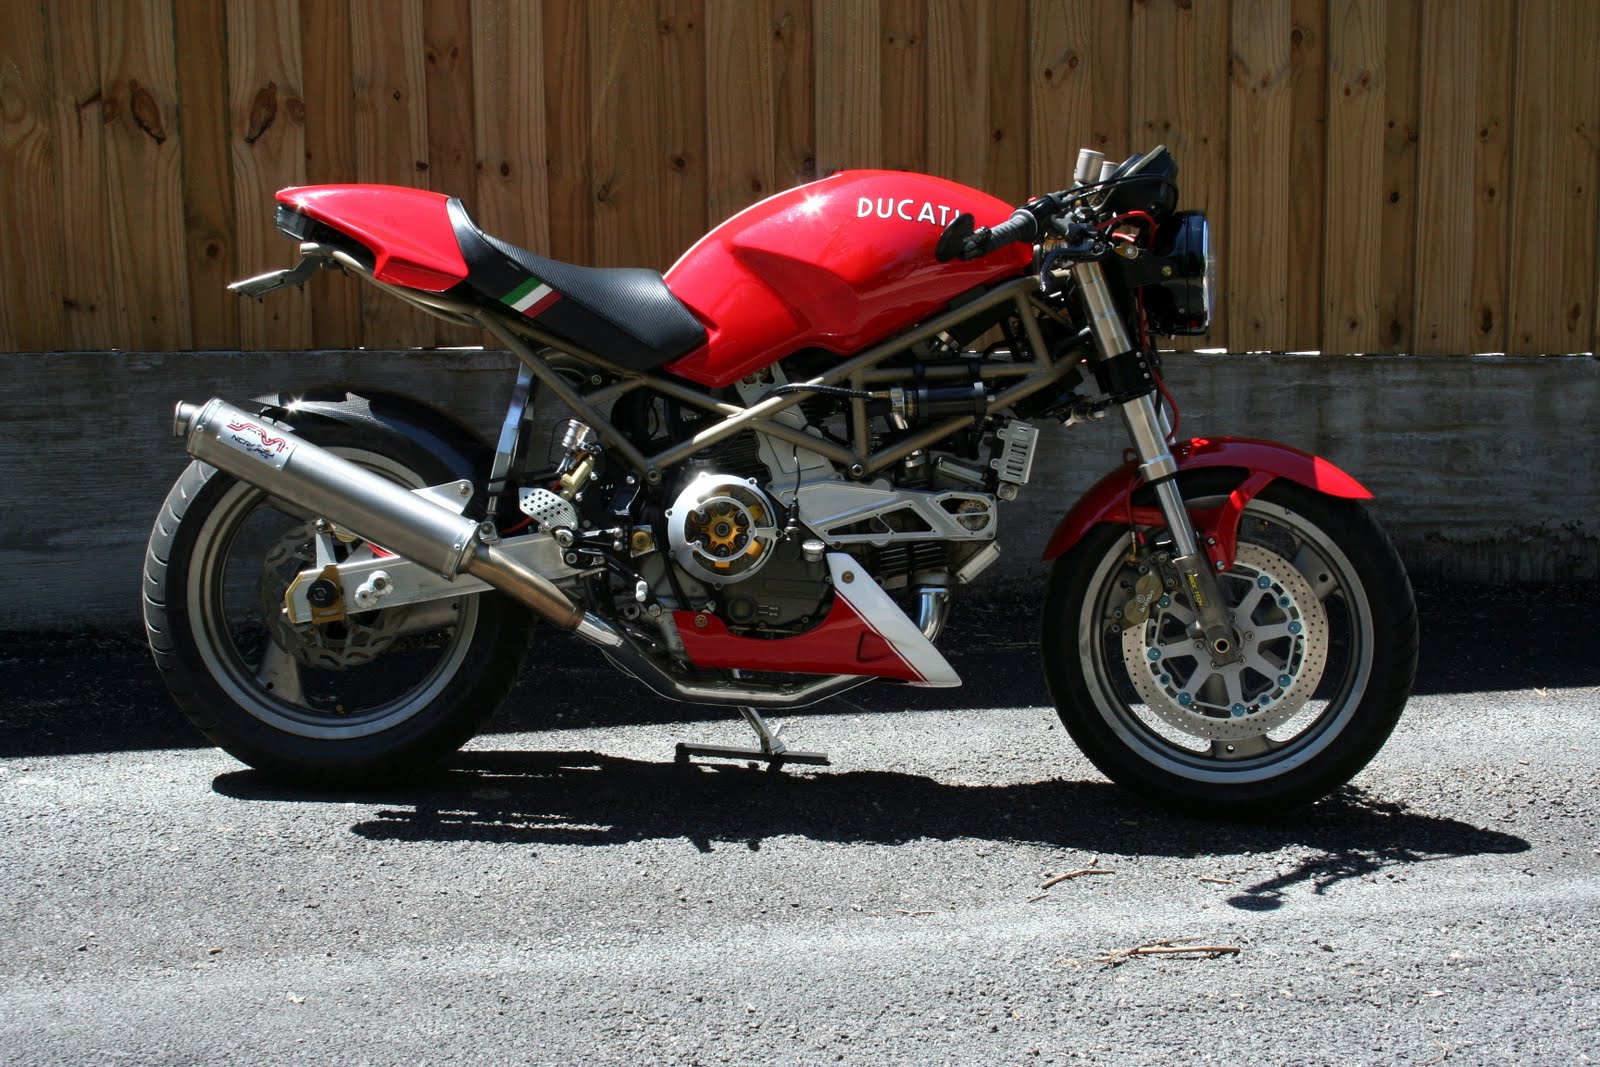
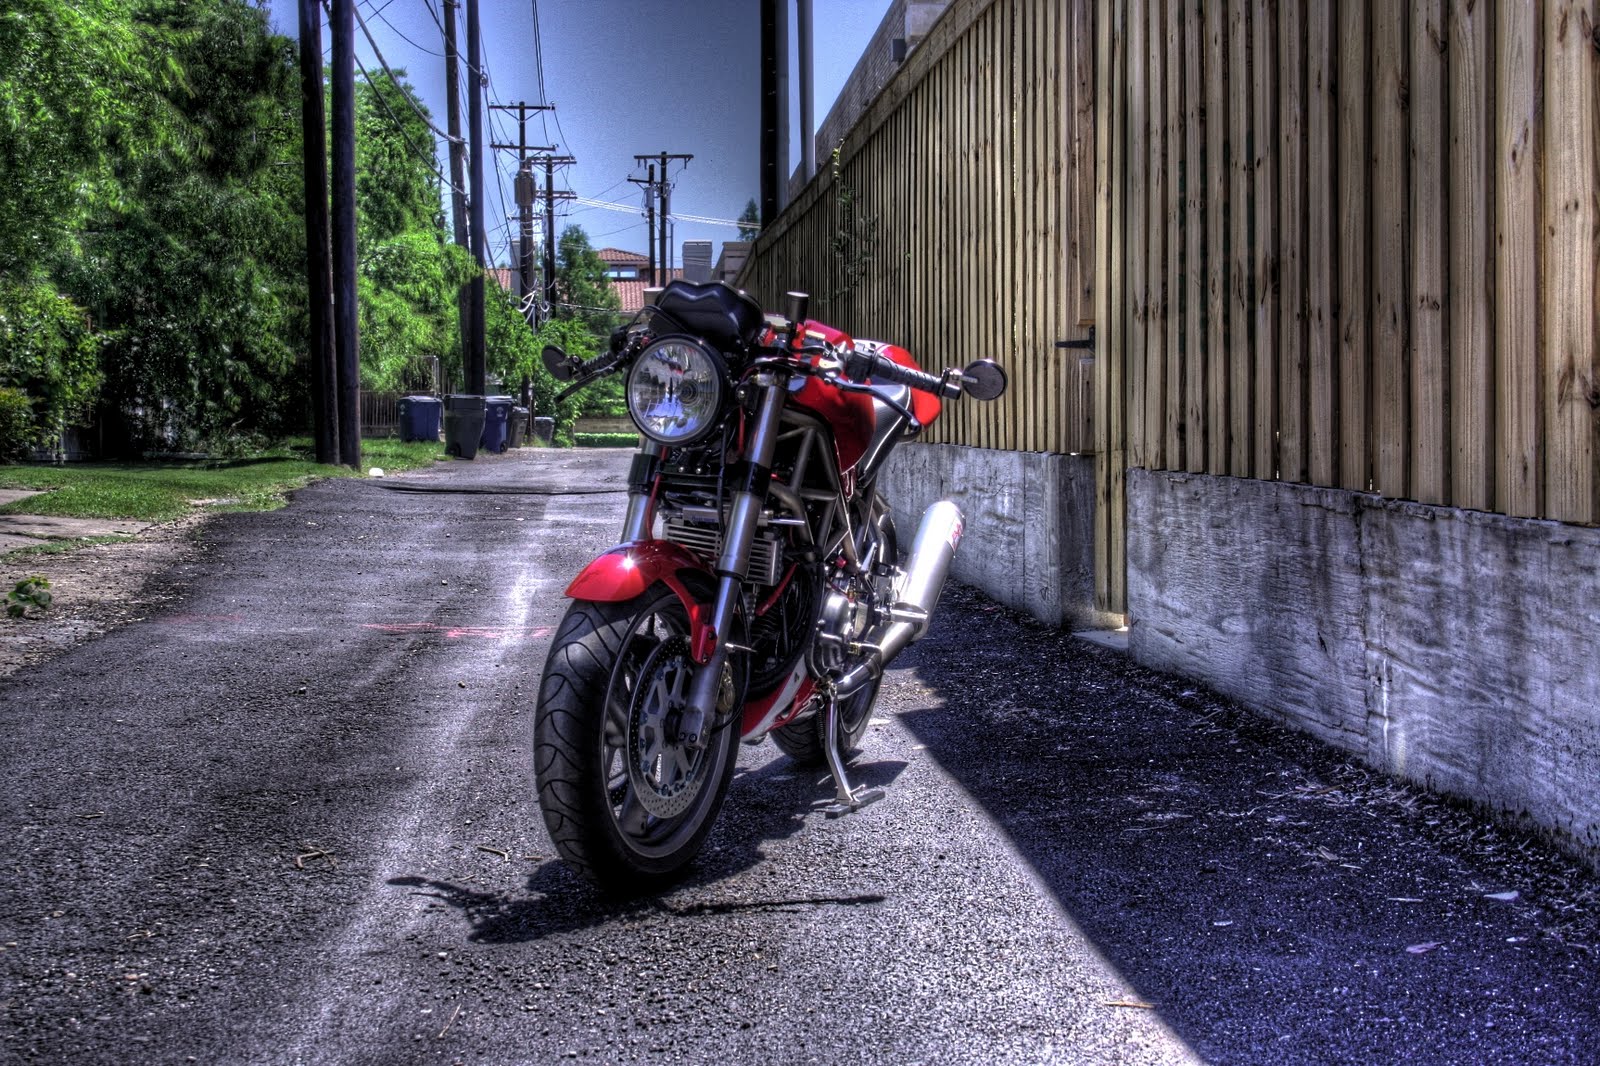
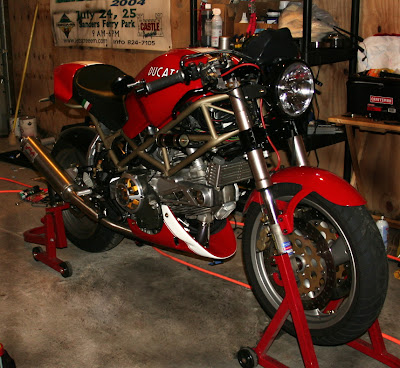
      It was originally a rebuild of a 1999 Ducati Monster 900. But the rebuild was finished years ago, and I just keep tinkering with it as the days go by. So I changed the title to "The Ducati M900", which was fitting up until about two weeks ago.

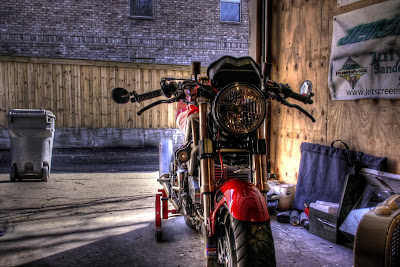
      I now have a second 2v Ducati 900 motor - a project motor. It originally came in a 2002 Ducati Supersport 900ie. I came by the engine, swingarm and exhaust in not so good condition. The plan for such a motor is to get me on the track, on a fun 2v 900 that's been "built" up a bit.

      Problem is, the injectors are crap. Been sitting quite awhile and they show a little bit of corrosion. Perhaps somebody is into fixing such a part up, or is in need of a set, either way - there up for grabs for cheap. Likewise, the swingarm, though it looks ok, I am not 100% sure it is straight. I do not have another Supersport swingarm to compare it to, so there's no telling at this point. (Up for grabs for cheap too.) I also acquired three swingarm adjusters for the Supersport - anybody needing any?

      Why not keep those parts? This motor is getting torn completely down, and upon rebuild completion, it is going into a non-Supersport frame. No, not another Monster. I've gotten hold of a 2003 Ducati 
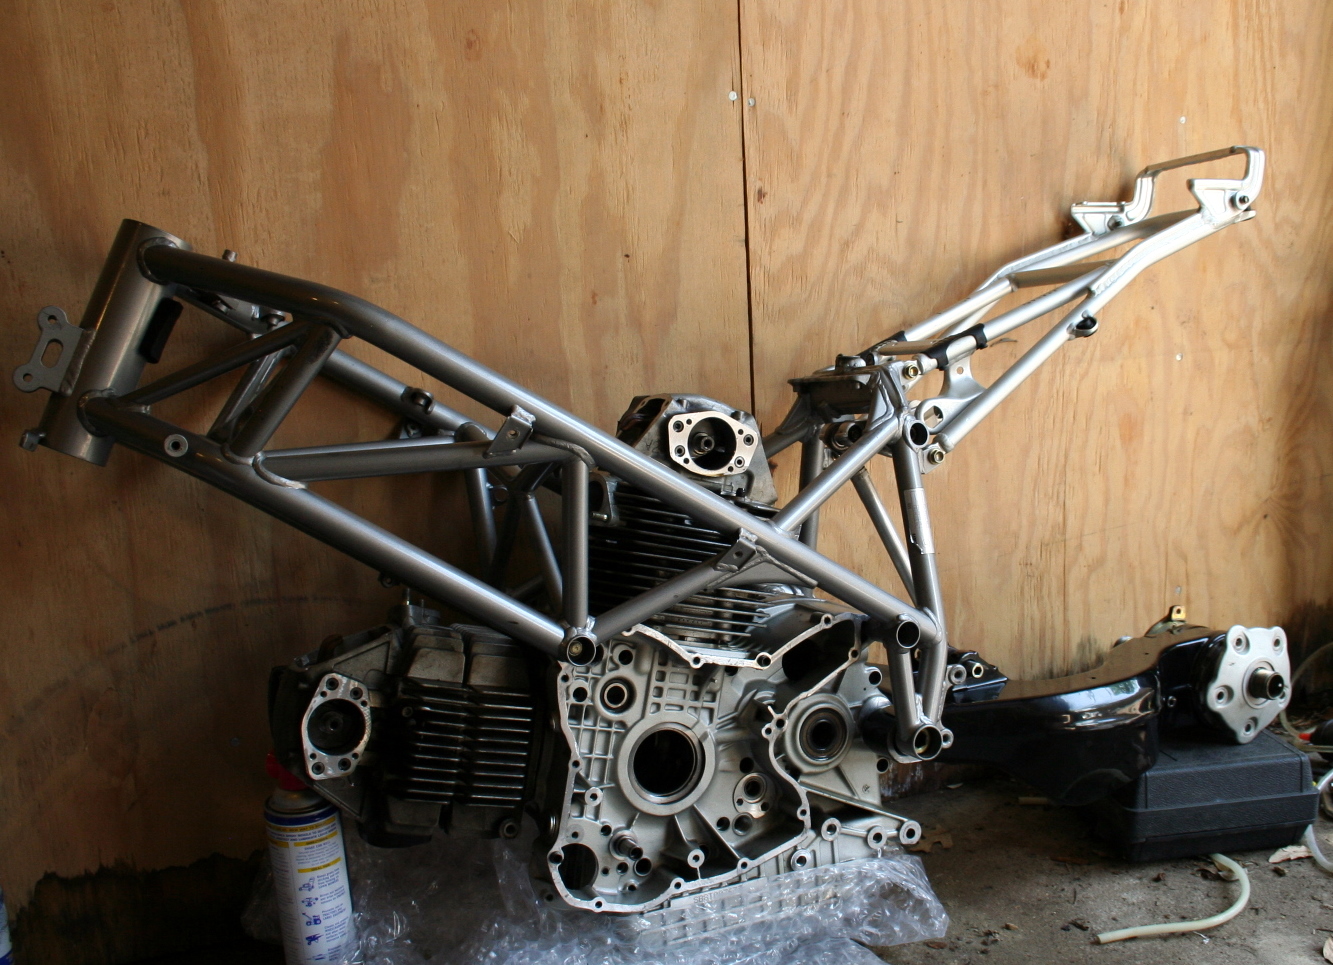
748 frame that has never been registered. An american pilot that had stopped over in Italy was able to pick this up, complete with all paperwork in early 2003 since the factory had moved on to producing the 749. (2002 was the last year of the 748). So its a bit of an oddball frame - VIN shows its a 2003 748, as does the paperwork. It had never been registered because of the looming import tax waiting for it upon its registration. No big deal, mine's for track use. (How's that for stickin' it to the man?)

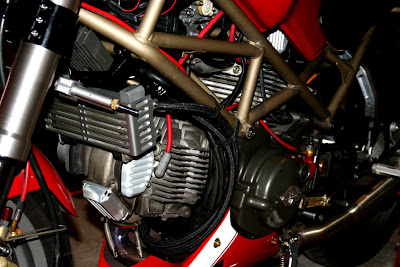
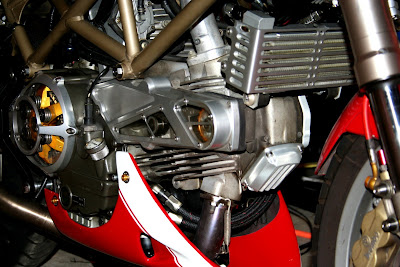
      The plan is to make it a Monoposto 748/996/998 era superbike, without side fairings, and with a 2V 900 motor inside. Putting a 2V motor in a superbike frame is not trivial, unless - perhaps - if one was using a Hypermotard or Multistrada engine. The swingarm mounts in generally the same location, but the cases are machined narrower where it normally connects on the superbike. On the 2v motor, the swingarm bearings ride inside the engine's casing, while on the superbike, those bearings are in the swingarm. Similarly, the distance between the swingarm pivot and the rear motor mount on the 748 is slightly longer than the distance on the 2V motors. To make short work of this, I've sourced a set of 748 cases and hope to find it possible to switch everything from the 900's cases to the 748's, including cylinders and heads.

      I've got a set of lightweight primaries ready for the bike, and plan to bore the cylinders to accept the Mahle 95mm pistons from Chris at CA-Cycleworks. The cylinders would be bored through Millenium Technologies, as that has been customary, with carillo rods and the crank balanced and polished (perhaps SPS style) by Fox Performance Engines. To finish off the bottom end of the motor and periphery, a lightweight flywheel and titanium bolts throughout. For ignition, a set of DynaCoils connected to another Ignitech unit, using the timing gear's two recessed teeth as the pickup (just like the pickup system on the aircooled 2v bikes). The top end will have ported heads with big lift VeeTwo "212" 'Race' cams, and MBP collets.

      Fuel supply will be metered by Keihin Split Single Carburettors on short manifolds, though this will require a modification to the cross braces of the 748 frame. The tank will still be a superbike tank, though fuel will not be pumped from an internal fuel pump, but rather through the standard vacuum style pumping of the carb'd monsters, or the fuel pump of the carb'd Supersports.

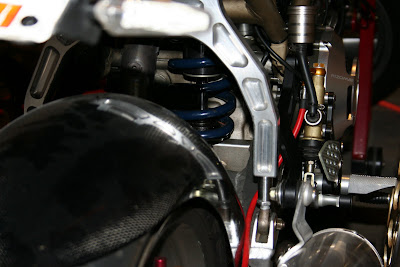
      Using a Superbike chassis allows me to use other Superbike parts. This includes an aluminum monoposto subframe, and an aluminum "race" fairing stay. Likewise, suspension and geometry will also be from a Superbike. This includes the triples, forks, cross-mount damper, and shock. I plan on taking my time to complete this project, so I hope to be able to carefully choose among the components that will suit my (lack) of experience best, and make for a nice, unique Ducati.

      For bodywork, I plan on using a monoposto tail section, race front fairing (and air intake runners to direct air towards the carburettors and cool the vertical cylinder), superbike front and rear mudguards, and a 2V "long" belly pan. Essentially, the only fairings the bike will have is the windshield/front fairing, and the bellypan. This bike won't be naked, but perhaps you might call it "bra and panties". On the other hand, I call it:


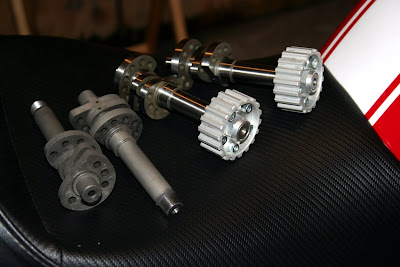
      At this point, all of my "plans" are simply ideas. The only thing I've done so far is acquire the motor, secure a frame, and then began disassembly. So far, the pile of parts removed from the motor include the flywheel, sprag gear, oil pump and gear, starter, pistons, cylinders, heads, valves, side cases and a few other small bits. The "big" pieces remain to be removed, like the primary gear(s), the timing gear and central timing belt pulleys. I'm quite open to suggestions or ideas for the build, so throw anything you have this way. If something I've said is draws a red flag, don't hesitate to let me know. I have been known to mistype things (they don't always come out they way you understand them in your head) and other times I've been wrong (happens to us all from time to time).

      This type of build has been inspired by Tom Hull's 944 Corsa (shown below), and the Radical Ducati bikes (shown below). 
      Tom Hull's 944 Corsa (Pictures and info from DucCutters.com)


      Radical Ducati's RAD 02 (Pictures and info from DucCutters.com)

      05 April 2010

      Engine... to Date.

      Well, after some tuning issues with the worn-out Mikuni carburettors that are originally equipped, my bike will be wearing the Keihin FCR 41 flatslide carbs very shortly. Over time, carbs not only gunk up, but also some of the small parts can wear. Among the wear parts are the needle, the tube which it runs in, and the seals throughout. All of this effects the felt "jetting" of the carb - how rich the bike is at idle and at off-idle response.

      The  Mikuni carbs on my bike, 38mm CV-type, had been jetted years ago using a Stage 2 DynoJet kit. I might tell you that if I was doing it over again, I'd use the FactoryPro set up. I do like their products a tad better, but I'd still be lying. I'd skip the jet kit altogether. Its a mediocre improvement, and a waste of money in the long run. The Keihin carbs function worlds better, don't have ten-gazillion tubes running in and out of them for vacuum comparison, and remove the choke. Regarding that last bit, removing the choke is something I'm looking for. After upgrading my master cylinders on both sides to Brembo GP Radial masters, the clutch side lost the mounts for the choke. I had to simply wedge it between the master and the switch housing. It worked, but removing cleans up the cockpit and starting a bike with Keihin's isn't difficult even without a choke. Sidenote: switching to Brembo GP's also loses the ability to use standard mount mirrors, you must use bar ends if you change (Fine for me, I like the CRGs a lot).

      This addition of "proper" carbs for my Ducati 900 rounds out a pretty decent engine package. I've yet to install the MBP collets, or the VeeTwo cams and valves, and haven't decided about pistons, but things are waiting until further down the road, much like lightening and polishing the crank, and lightening the primary gears.

      The motor, upon throwing on the new carbs, will consist of:
      • Keihin FCR 41 carburettors
      • UNI Foam Pod Filters
      • Sil-Motor Equal Length Spaghetti Headers
      • Sil-Motor / NCR titanium round low pipes
      • DynaCoils
      • Ignitech TCIP4 Programmable Ignition
      • Nichols Flywheel and Jamb Nuts
      • VeeTwo Adjustable Cam Pulleys
      • AG Hammer Power Pulse Box (PPB) - a capacitor to help out the electrical system a bit
      • Ceramic Coated intake manifolds and exhaust headers
      • Kickstarter (just kidding)
      I call that a fairly good start. It runs like a champ, smoothly (and quickly) revs, and drives fairly hard out of turns. Its no superbike, but it is a blast to ride. That's what I've been going for and the bike certainly keeps me happy. 

      The motor has a few small dress-up pieces or 'insurance' pieces on it as well, here's a short list:
      • Rizoma billet aluminum belt covers
      • SpeedyMoto billet alternator case cover
      • CycleCat billet aluminum sprocket cover
      • Case Saver Insert
      • DP Billet Valve Inspection Covers (on the horizontal head, with the oil cooler mount powdercoated black)
      • DP Billet cam end covers (on horizontal and vertical heads - just a decorative plate over the actual cam end plate)
      • Rizoma Oil Cooler Guard
      Future engine work won't be extreme, but will be done as time and money allows. Since I'm into making lists today, here's a short bit of that:
      • Lightened Primary Gears, preferably with hunting tooth, a la VeeTwo's former kit.
      • Crank pulled for polishing, lightening and perhaps knife edge when its balanced for...
      • High Compression Pistons (904, 944, or 964? No, I don't want to modify the cases for 984).
      • Might as well throw in some higher quality rods while I'm at it.
      • Install VeeTwo high torque cams, new valves (OEM sizing)
      • Port heads for increased flow, then paint the suckers a nice black or red
      • Dual Plug heads (only a passing thought)
      • Oversized Oil Cooler. The new NCR looks very nice, as does the new Febur (the curved one for the Hypermotard which would require plugging the oil temp port on the top.) The old Febur was not curved, but would be a bit cheaper. Perhaps I can be convinced to relocate the oil cooler under the seat like the Benelli (see picture below)
      • Set squish on assembly, adjust timing to run on pump gas.
      That's all the lists for today. In the spirit of DucatiSuite, I'll be posting up progress pictures of the Keihin installation, and possibly making a how-to for my battery box and pod setup. 

      Benelli Tornado's under seat radiator, 

      30 March 2010

      2010 Trackdays!

      Advanced Motorsports has released their lineup of trackdays for 2010. I'll be at these, whether or not I'm riding on track.

      Here are the dates:
      • Sunday,   April  18th  2010
      • Monday,   May    10th  2010
      • Monday,   June   7th   2010
      • Saturday, July   24th  2010
      • Monday,   Sept.  13th  2010
      • Sunday,   Nov.   7th   2010
      I like the way that Jeff Nash and the crew handle these. Last time I was out there, Larry Pegram was out on the track with the group and the numbers were nice and small on the track. These are, like the one I went to in the fall, Ducati-Only trackdays. Perhaps you can come on other euro-bikes, but the focus is on Ducati Enthusiasts and their bikes.  Based on the other trackdays I headed to last year, this kept the squids out, which brought dangerous moves and crashing down considerably. Perhaps its just the mindset at the other tracks, but some of the riders forgot that there's no trophy ceremony or podium waiting on them when they pull off!

      I certainly plan on getting the bike out there on the track for a few of these, and perhaps I'll have built the 900SS or 900SBK by the last few!

      Here's the link to the AMS site and the trackday info is on the banner at the top: http://www.advancedmotorsports.com/

      29 March 2010

      10 March 2010

      Spring Update

      Its been awhile since I've updated last. Lots of things have changed included the abilities of the rider. I'm working more closely with a local shop on different abilities, which coincides nicely with the just begun WorldSBK season, and the upcoming MotoGP season. (I do also regularly watch the AMA races, but thanks to DVR, I seem to put them off until lazy afternoons and don't really keep up with that league in real-time).

      The bike has been taken apart for a bit after getting some good miles on fair-weather days in the late-winter/early spring. The weather in DFW is funny and quite unpredictable. It dumped snow recently, without much prediction, and was 70 degrees outside shortly before, and shortly after that weekend.

      The bike is having bungs welded to the exhaust headers so a fuel/air ratio monitor can be easily attached to aid in tuning. After the welding is complete, the headers are being shipped off to be coated by Jet Hot, along with the intake flanges. The principle behind ceramic coating is quite simple and something I enjoyed working as an undergraduate in Fluid/Thermal Systems.

      To simplify, A biker wants the exhaust to get out of the motor, and out of the pipes quickly, for performance reasons. Similarly, a biker does not like getting burnt by the heat coming off the exhaust pipes. And lastly, if a biker can keep the bike's ambient temperature down, he can extract a little more performance all around (from cooler fuel, to easier engine cooling, etc).

      Ceramic coating benefits all of the above. In a standard setup, the expelled exhaust gases are free to lose heat through the walls of the exhaust, evident if you've ever grabbed a hot exhaust pipe or, worse, header pipe. The exhaust gases cool as exhaust gas loses heat to the metal, and then to the ambient air. This cooler gas becomes more dense and moves more slowly. If the pipes were insulated, via exhaust wrap or ceramic coating, the exhaust gas would be less able to release heat before exiting the pipe. Good for performance, good for your extremities which get too close on occasion, and good for keeping radiant heat down.

      The ceramic coating process, in its preferred form, adds the coating to both the inside and outside of the pipe. The intake manifolds, those which connect the carburettors to the cylinder intakes, are also being coated. Instead of keeping the heat in those pipes, as the goal is for ceramic coated exhaust, the goal is to keep the heat out of the intake air. A cooler, denser intake air increases performance of the motor as well.

      While everything is apart, the carbs have been pulled to be thoroughly cleaned, and since the fuel lines and vacuum hoses all around have been on the bike for well over 5-years each, its time they be replaced. While the lines are being replaced, I took the opportunity to remove the vacuum petcock system and replace with a good old fashioned fuel valve. No more risk of vacuum troubles arising from the petcock's failure, it's related hose failure, and a cleaner look all the way around. The fuel pump needed rebuilt as its the original from 1999 (likely put on the bike in 1998 during assembly and sitting on the shelf for who-knows how long before that). Chris Kelley of CA-Cycleworks sells a convenient, inexpensive vacuum operated Mikuni replacement that is rectangular to replace the vacuum operated Mikuni pentagon shaped pump. The great bonus with the replacement fuel pump is that its cost is the same as the rebuild kit!

      The fuel supply line is now run around the left (alternator) side of the bike, rather than in front of the vertical cylinder belt cover. To keep heat away from the fuel line and fuel inside, the lines have been insulated with Heatshield Products heatwrap (Builders Kits) or the similar material from McMaster-Carr.

      The idea of putting everything back together, only to bolt up the OEM Mikuni 38 CV carbs is perhaps a little much. This may be the easiest opportunity to bolt up a set of Keihin FCR-41s that I'll have, and with my recent carbon fiber fabrication (thanks unofficially to friends at Lockheed), I could also make a new battery box and coil bracket, and go to the more attractive (though debatable/negligibly worse performing) pod filters. The next question that would arise is... K&N Pods or UNI Filters?

      07 January 2010

      Headlight & HID

      Its been awhile since I have installed the Desmoworld Clear Glass Headlight, but I noticed I have not posted any pictures of the unit! I had the ring powdercoated black, it comes chrome just like the stock headlight's ring. Here's an image with a standard H4 bulb (that happens to be blue, go figure):


      HID Lights are all the rage right now, and for good reason: they are far brighter than conventional lights. With motorcycles, the more light the better, as there's often only a single headlight beam available. The common fix has been to increase bulb wattage to get a brighter output. While this does work, it also taxes the electrical system, which is not very robust on a motorcycle. HIDs put out a whole lot of light while using a low wattage, and are therefore very well suited for motorcycle applications. I tried out a DDM Tuning kit that's a 35W, 4300K color output setup. The wiring came to me with far more than I could ever use. With some quick cuts and some wires soldered and heat shrinked, I was able to remove what would have been a bird's nest of wires under my tank and fit the unit in the bike quite easily. The unit I have is the H4 Hi/Lo single bulb setup. This means I can still hit the brights switch and get a raised output from the headlamp. It works very well. Its almost TOO bright, so I have decided to be proactive and aim the headlamp down a little more than normal so I don't blind all of the DFW drivers. Here are a few shots of the unit installed:


      Nearly finished (with Winter Project)

      Had a little bit of trouble removing the old, corroded bolts from the front rotors. The factory bolts are M8x20 zinc plated steel bolts, with allen heads. I hate the allen head, especially in places that require a good firm torque setting. They are prone to torque-out and that's exactly the problem these old bolts had. Using a little bit of solvent and some bolt-outs from McMaster-Carr, these were all removed. New torx-head titanium bolts will be replacing them along with the ISR dampened rotors, from Desmoworks. The new rotors don't use an incredibly heavy steel carrier, and are floating (yet dampened - to increase the 'buttons' life).

      The Aeroquip Starlite hoses and forged fittings, supplied by Baller Bolts went on without a problem. Note about BB, the owner is member RyanRacer of the DMF, and is very helpful to deal with. If you are going to do this job, its as easy as getting the appropriate size fittings (AN-6) and a length of hose, cutting it to size and putting it on.

      The starter wire and oil cooler hoses have both been rerouted along the alternator side of the bike, so there is little visual obstruction and easy access to the horizontal belt and cover.

      Here's the hoses tucked up against the frame and out of the way:


      Notice the DP/DPM Cam End Cover. And the "now cleaner" looking side:


      Shown are the DP/DPM billet valve inspection covers, Rizoma Oil Cooler Protector and Aeroquip hoses. Its also quite evidence from the clean appearance of the new billet that my horizontal cylinder head has cooked on some serious dirt over the years. Perhaps next season I'll finally pull the heads, have them painted black, and one of the performance cam sets will go in:


      Shown, left to right, are sets of VeeTwo Torque Grind Cams (V2-210) and Race Grind Cams (V2-212). The Monster already has a set of adjustible VeeTwo cam pulleys, the silver pictured pulleys are a set for the 900SS or M900 trackbike that I have yet to obtain!

      01 January 2010

      On Geometry

      Recently, I've made two changes to the bike's geometry. The 1999 Monster is a member of the 1993-2001 Monster Frame series, which shares many features with the 851/888 bikes. The main differences are an additional brace near the steering stem was removed to accommodate the Monster's air box and the rear section of the frame is welded on, rather than being a subframe (subframes ARE used on all 'new' Monsters, a la 696/1100 and generally all other Ducatis, including the Hypermotard and the Superbikes).

      A distinguishing feature of the 851/888/Monster's frame from the newer 2002-2009 ST based Monster frames is the hooped swingarm suspension. The swingarm connects to a hoop or arch that connects to a pivot or lever arm, which in turn is connected to the top of the shock. The hoop is originally made of steel and comes the color of the bike's frame. Thus, mine was antique gold. Until I changed it. For several years, I've been running a lighter and stiffer billet swingarm hoop. It left the geometry essentially the same, but gave a slight amount more feedback while looking really good. It came to my attention that DMF Member sweir1171 was making a ride-height adjustment kit. The kit features two machined, threaded risers that will raise the tail of the bike a few cm. They work fantastically and went right on.


      Such a modification will change the wheelbase of the motorcycle and quicken steering.


      While I quite liked the quicker steering and change in feel, I was also interested in improving the feel of the front end. The forks have been reworked with a basic respring, revalve and re-oil using RaceTech components, but aside from the slightly stiffer and lighter CycleCat top triple and clipon handlebars, not much else had changed. This is when I contacted IMA SrL. These guys are fantastic to work with.

      There are a few differences in the pre-02 Monster frames and the newer Monster (02-09) frames beyond the rear suspension assembly. The older frame Monsters, along with all Supersports, utilize a narrow steering stem and are equipped from the factory with tapered roller bearings. The offset (the distance between the centerline of the forks and the steering stem) is 25mm. To put this into perspective, superbikes frequently leave the factory with 36mm offsets, and aftermarket triples may change this down to 32 or even 30mm. Several vendors sell triples with offsets as low as 27mm (Ducshop).

      Newer Monsters (02+) have a bigger 30mm offset from the factory, use a much larger diameter steering stem and do not come with roller bearings from the factory (though one could upgrade to SpeedyMoto's set if they like). The rake change from old style monsters to new style monsters is a small but perceivable 23 or 23.5 (depending on the source you read) to 24 degrees. IMA produces beefy billet aluminum triple sets (upper and lower, including steering stem) for older Monsters and Supersports that increase the offset to 30mm, same as the new Monsters, and even allow for the use of a Monster-esque bar on a Supersport (if one was so inclined). They provided me with a black anodized set for my Monster.


      Installation involves suspending the front end of the motorcycle, removing the wheel, gauges, controls and anything touching the triples. Once that's all taken care of, the triples are loosened and removed from the bike. The inner races must be knocked out of the steering stem before the new races may be inserted. Then a new tapered bearing that has been well greased is driven on to the IMA triple's stem. The factory uses SKF bearings, and that's what I replaced the set with (obtained from CA-Cycleworks in SpeedyMoto's convenient packaging). Then its all put back together, titanium bolts all around, and you get:


      From a bit of a distance:


      Update - 3/29/2010
      The finished product has a trail of approximately 90.5mm, and started closer to 96mm. original wheelbase was 1430mm, and the final result is minimally smaller. The feel is fantastic on the street, though I've only put about 1,000mi on since the original writeup. I've yet to find really great roads outside of DFW like I had nearby in Middle Tennessee. Looks like its time to start taking off bling so I can track this bike. Or perhaps its time to invest in a 2nd bike for track only.